
Changing label of push button dynamically in module pool programming
Step 1 : Log on SAP and go to SE38 transaction, provide name starting with ‘Z’ or ‘Y’ (Here ‘ZRUNTIME_LABEL_CHANGE’ ). and click on create button (F5) .
Step 2 : Provide Title with suitable description, Type as ‘Module Pool’ , Status as ‘Test Program’ and save it as local ( Enter + F7 )

Step 3 : Click on Display Object List push button (Ctrl + Shift + F5)

Step 4 : Right Click on program name and select Create->Screen

Step 5 : Provide screen number. Here 9000
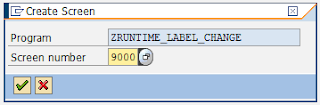
Step 6 : Enter description and save it

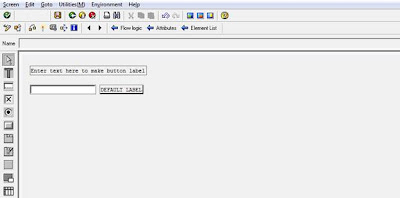
Step 7 : Design screen as below
Step 8 : Double click on screen number 9000 on right side, do uncomment code below PAI and double
Click on the module name to create it.

Step 9 : Copy the below code and paste it between module and endmodule.

DATA text(30) value ''.
DATA : repid TYPE sy-repid.
DATA : f1 TYPE TABLE OF trmsg WITH HEADER LINE.
DATA : dynp_header TYPE d020s,
tdynp_fields TYPE TABLE OF d021s,
tdynp_logic TYPE TABLE OF d022s,
tdynp_matchc TYPE TABLE OF d023s,
dynp_fields TYPE d021s,
dynp_logic TYPE d022s,
dynp_matchc TYPE d023s.
DATA: BEGIN OF dynproname,
prog LIKE d020s-prog,
dnum LIKE d020s-dnum,
END OF dynproname.
CASE sy-ucomm.
WHEN 'BUTTON'.
repid = sy-repid.
CLEAR: dynp_header, dynp_fields, dynp_logic, dynp_matchc.
REFRESH: tdynp_fields, tdynp_logic, tdynp_matchc.
dynproname-prog = repid.
dynproname-dnum = '9000'.
IMPORT DYNPRO dynp_header tdynp_fields
tdynp_logic tdynp_matchc ID dynproname.
LOOP AT tdynp_fields INTO dynp_fields
WHERE fnam = 'BUTTON'.
dynp_fields-stxt = text.
dynp_fields-leng = 20.
MODIFY tdynp_fields FROM dynp_fields.
ENDLOOP.
EXPORT DYNPRO dynp_header tdynp_fields
tdynp_logic tdynp_matchc ID dynproname.
GENERATE DYNPRO dynp_header tdynp_fields
tdynp_logic tdynp_matchc ID dynproname MESSAGE f1 LINE f1 WORD f1 .
ENDCASE.
where the variable text stores the label for the push button.
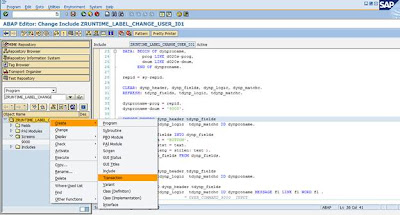
Step 10 : Right click on program name and click create->transaction
Step 11 : Give description and Click OK.
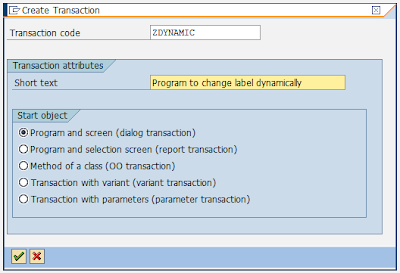
Step 12 : Enter your program name as Program and 9000 as screen number. Make sure you have selected all check boxes under GUI support. Save it
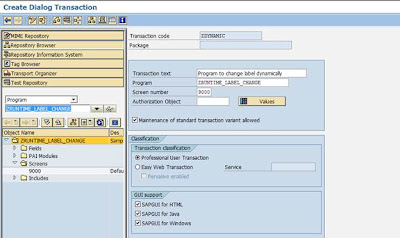
Step 13 : Double click on program name on right side, do right click and select ‘Activate’ (Ctrl+F3) to activate the whole program. Now Execute it.
OUTPUT :
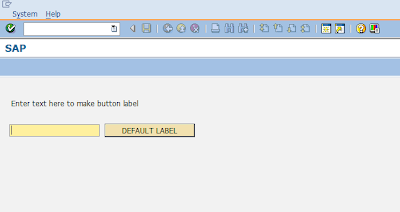
Enter any text in input field and press the push button nearby
Step 10 : Right click on program name and click create->transaction

Step 11 : Give description and Click OK.

Step 12 : Enter your program name as Program and 9000 as screen number. Make sure you have selected all check boxes under GUI support. Save it

Step 13 : Double click on program name on right side, do right click and select ‘Activate’ (Ctrl+F3) to activate the whole program. Now Execute it.
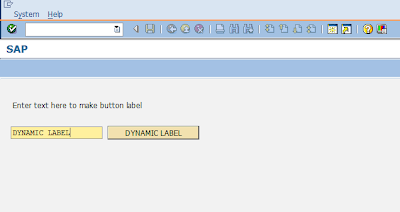
OUTPUT :

Enter any text in input field and press the push button nearby
